Image Credit: Microsoft
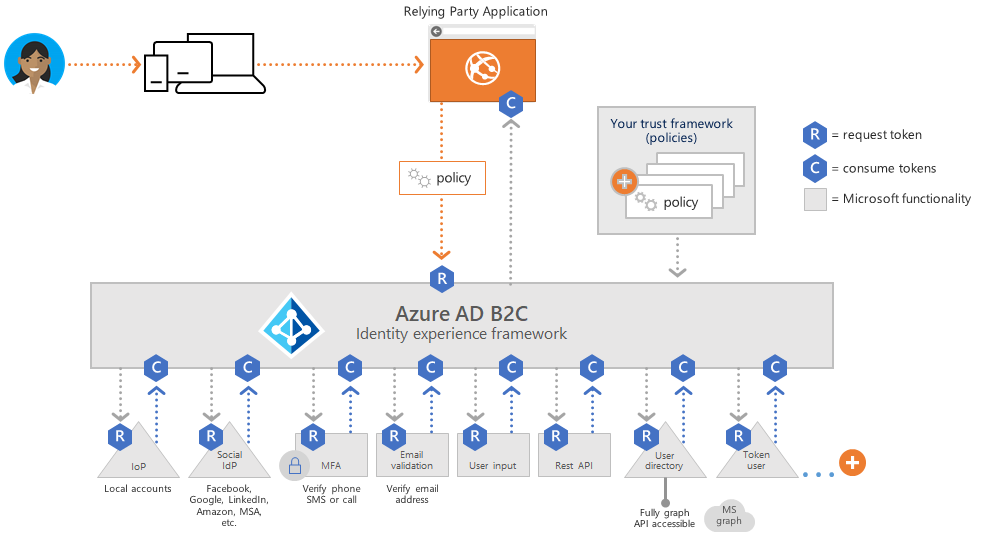
Azure AD B2C (Business to Consumer) is a powerful identity management service that allows you to control how customers sign up, sign in, and manage their profiles in your applications. One of the key building blocks of Azure AD B2C is the user flow — a predefined, configurable journey that users go through when interacting with your app.
In this blog, you’ll learn what user flows are, how to create one from scratch, and how to integrate it into your application. Let’s dive in!
What is a User Flow in Azure AD B2C?
A user flow is a guided experience that defines how users interact with your application during key identity operations such as:
Think of it as a “no-code” or “low-code” way to handle authentication and user management without writing custom policies.
Prerequisites
Before creating a user flow, make sure you have:
Step-by-Step: Create a User Flow in Azure AD B2C
Step 1: Go to Your Azure AD B2C Tenant
-
Log in to the Azure Portal
-
In the search bar, type Azure AD B2C and select your B2C tenant
💡 Make sure you're in the B2C tenant directory, not your default Azure AD directory.

Step 2: Navigate to User Flows
-
Under the Policies section in the left menu, click User flows
-
Click + New user flow

Step 3: Choose the User Flow Type
You’ll see several flow types available:
For this tutorial, choose Sign up and sign in, and click Create.

Step 4: Configure the User Flow
-
Name your user flow (e.g., B2C_1_SignUpSignIn)
-
Select identity providers (e.g., Email, Facebook, Google)
-
Choose user attributes and claims to collect and return (e.g., Display Name, Email, Given Name)

Click Create once your settings are finalized.
Step 5: Test the User Flow
After the flow is created:
-
Click on the flow name from the list
-
Click Run user flow
-
Choose your registered application and redirect URI
-
Hit Run user flow to test it in a browser

You’ll see the sign-up/sign-in page in action!
Integrate the User Flow into Your Application
To hook your app into this flow, use the generated OpenID Connect or OAuth 2.0 endpoints provided in the flow details. You can integrate this with:
Your app will redirect to the user flow URL, and upon successful sign-in, receive a token to use for API access or session management.
Customizing the Look and Feel
Azure AD B2C allows you to customize the UI using:
For advanced scenarios, use custom policies (Identity Experience Framework) for more control over the user journey.
Pro Tips
Creating a user flow in Azure AD B2C is the first step toward building a seamless and secure authentication experience for your customers. Whether you're developing a web app, mobile app, or API-driven solution, user flows offer a simple, configurable way to handle identity — no custom code required.